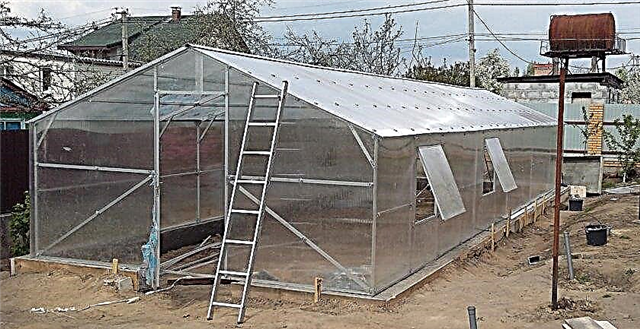
The installation of the greenhouse allows the gardener to grow vegetables and herbs for several months longer. There are many options for building greenhouses. However, increasingly, vegetable growers prefer polycarbonate greenhouses on a frame made of metal. In this article we will look at how to build a polycarbonate greenhouse from a galvanized profile with our own hands.
Advantages and disadvantages of a profile greenhouse
Like any building material, the metal profile has its advantages and disadvantages.
- Positive sides:
- Galvanizing a metal profile will not allow rust to appear within 2-3 seasons.
- The damaged section of the frame from the professional pipe is easily replaced.
- These materials are easy to assemble, easy to care for in the future.
- Given their durability, they are relatively inexpensive.
- No special skills are needed in working with the profile, which means that you can save on the work of specialists.

- Negative sides:
- There is a clouding of polycarbonate in places of contact with the frame.
- Over time, there is a need to replace rotten frame elements.
Profile Types
The galvanized profile has such qualities as:
- strength;
- rigidity;
- ease.
The metal profile is divided into: racks (CD, CW) and guides (UD, UW). The thickness of the profile is from 0.4 to 0.6 mm, in construction it is used when mounting drywall.
Differences:
- Profile racks can withstand significant loads, so they have stiffening ribs, longitudinal corrugations and edges in the shape of the letter C.
- Profile guides are used in the form of horizontal fasteners. Horizontal guides are connected to the posts with self-tapping screws.
- Profile galvanization has differences in cross section. The guides used for the ceiling have dimensions of 28 × 27 mm, the size of the racks is 60 × 27 mm.
- Arched (figured) profile CD, UD, UW - used to make arched doorways, any complex curved structures, as well as arched stairs and greenhouses.
Did you know? A greenhouse cannot be in the form of a transparent airtight bubble in which plants grow. The design must include at least two (or more) ventilation openings located on opposing walls. The most optimal arrangement of ventilation windows is under the ceiling: this is where the hottest air masses gather.
Profile Selection
The consumer chooses a metal profile based on the purpose of the application. The thicker the metal profile, the greater the load it can carry. In case it is supposed to be used in the construction of the greenhouse, the thickness of the metal profile plays a very important role, because being in a warm and humid environment, a thick metal sheet will be able to resist the appearance of rust longer.
For ceilings and walls
The racks of the wall profile have such dimensions: 100 × 50 mm, 75 × 50 mm, 65 × 50 mm, 50 × 50 mm. The dimensions of the guides of the wall profile: 100 × 40 mm, 75 × 40 mm, 65 × 40 mm, 50 × 40 mm. For fastening sheets of drywall to the wall, CD and UD galvanized profiles are used. CD is used as the profile of the rack and goes from the bottom to the ceiling, UD is used as the guide profile and goes along the floor and ceiling.

Septum
For partitions, a U-shaped profile is used, in trade it is available in the following sizes: PN-50 (50 × 40 mm), PN-65 (65 × 40 mm), PN-75 (75 × 45 mm) and PN-100 (100 × 40 mm). In the guide profiles there are special holes with a diameter of 8 mm under the dowels. It must be remembered that the guides can also be marked with the letters UW, for example, the UW-50 is identical to the PN-50 marking. In addition to the longitudinal guides, for creating partitions, rack profiles having the shape of the letter C are also used. Rack profiles for partitions are available in the following sizes: PS-50 (50 × 50 mm), PS-65 (65 × 50 mm), PS-75 ( 75 × 50 mm), PS-100 (100 × 50 mm). The transverse size of the backrest of the rails and rack profiles is the same, since they are connected to each other.
Did you know? For growing cucumbers in a greenhouse, the presence of carbon dioxide in the air is important. In small garden greenhouses, carbon dioxide can be provided to cucumbers by installing a 20-liter tank with a fermenting mullein solution in the greenhouse.
How to build a greenhouse from a galvanized profile with your own hands
For men who have some skills in working with tools, it will not be difficult to build a small greenhouse measuring 6x4 m with a frame from a professional pipe and transparent polycarbonate according to the drawings.
Necessary materials and tools
To work, you will need:
- polycarbonate (cellular, transparent);
- metal frame profile 4.2 or 5 cm wide;
- sand, gravel;
- cement;
- particle boards or formwork boards.
Tools:
- formwork nails;
- self-tapping screws;
- connecting fastenings of the coating;
- secateurs for metal;
- electric drill, grinder and screwdriver;
- screwdriver;
- plumb line and level, marking cords;
- capacity for the preparation of cement mortar;
- buckets, shovel.
Did you know? ABOUTthe city dweller needs to remember that the grown cucumbers and tomatoes do not get along well in the same greenhouse. Cucumbers like heat and very humid air, and for tomatoes, moist air is a provocateur of the occurrence of fungal diseases. In addition, during heat above +28°C tomato pollen becomes sterile and the fruit does not set.
Choosing the shape, size and location of the greenhouse
All preparations for the start of construction are divided into several stages:
- The choice of place. For these purposes, it is necessary to choose the sunniest place on the site. It is desirable that the soil under the greenhouse be sandy, this will provide drainage and reduce the level of humidity in the greenhouse. The most advantageous location of the greenhouse in the north or south. The sun rises in the east, through the transparent coating the air in the building quickly heats up, and at noon, when the sun is in the south, the greenhouse stands longitudinally against the sun and absorbs less heat. As the sun begins to fall in the west, the last rays of the sun again warm the greenhouse air. In order for the greenhouse not to cool off from the wind, it should be located in a place protected from it, but not under large trees, since a large amount of shade has a bad effect on greenhouse plants, and occasionally falling branches can damage the roof and walls.
- The location. Despite the simplicity of working with a metal profile and cellular polycarbonate, disassembling and transferring the structure will require quite a lot of time, so you should abandon portable or temporary structures. The optimal will be a stationary greenhouse on a good foundation. In such a greenhouse it will be possible to work in the garden even in winter, but in this case it is necessary to provide a heating system.
- Form of construction. The most convenient is a rectangular greenhouse with a roof in the form of an arch. To reduce the cost of construction, it is advisable for the owner to calculate the structure and assemble according to the drawings. Using project documentation will help to more accurately determine the amount of purchased materials, as well as reduce the amount of waste. In the calculations, it is necessary to focus on the typical dimensions of a polycarbonate sheet (210 × 600 mm).
- Type of foundation. Reliable support will extend the life of the greenhouse several times. For greenhouses, several types of foundations can be used: wooden, brick or concrete. In the concrete foundation, options are also possible: asbestos-cement pipes buried in the ground with concrete filling, columns laid out of brick or reinforced concrete blocks, a strip foundation. It is the foundation that helps to improve the quality of polycarbonate greenhouses on a galvanized profile frame.
Important! Before buying polycarbonate, carefully read its characteristics: if the manufacturer indicates the weight of the standard sheet (210 × 60 mm) is less than 10 kg - refuse to buy, because it is not too high-quality, lightweight polycarbonate. Such material will not last long, it can be damaged by falling hail or burst under the weight of wet snow.
Calculations and drawing
Before starting the purchase of building materials, the builder needs to calculate their number based on the construction drawing. The number of sheets of polycarbonate is quite simple to calculate. Taking into account that the standard width of the sheet is 210 cm, and the sheet is bent only in length, the length of the greenhouse should be a multiple of the lateral width of the sheets. For example, from two standard sheets of polycarbonate, a greenhouse will be obtained in length: when building an overlap - 4 m, when building a joint in a joint - 4.2 m.
The required number of galvanized profiles in meters of both racks and rails is not difficult to calculate according to the drawing of the greenhouse.

Foundation arrangement
The foundation for the greenhouse can be made from both concrete and wood (a lighter and cheaper, but short-lived option).
A concrete foundation for a greenhouse is prepared as follows:
- Using the marking ropes and pegs, mark the perimeter of the future structure. According to the marking, dig a shallow foundation pit (20-30 cm).
- A sand layer (10-12 cm) is laid on the bottom of the pit. Boards are attached to the walls of the foundation pit to create a formwork form.
- Crushed stone, sand and cement are mixed, after which the mixture is poured into the formwork. During concreting, iron corners or pipe cuts are inserted into unhardened concrete (around the foundation pit in the right places). They will later be attached to the frame of the greenhouse to the foundation of the structure.
- On top of the concrete screed foundation, you can lay another 2-3 rows of bricks around the perimeter of the future greenhouse, but this is not necessary. Between the concrete screed and the bottom row of bricks, a waterproofing layer is required.
Did you know? Compact greenhouses tend to heat and cool faster than larger structures. In the summer heat, plants do not overheat so quickly, since the hottest air gathers under the ceiling of the greenhouse.
If for some reason the capital foundation is not suitable for the consumer, you can use a wooden foundation made of bars 5–10 cm thick for a greenhouse. It is not difficult to build such a foundation. On a flat surface of the soil, markings are made using pegs and ropes, after which wooden bars are laid according to the marking. Their angles are connected together by nails "weaving" or using cut grooves using the connection "dovetail".
Before starting to fasten the metal structure to the wooden foundation, the wood is impregnated with anti-decay compounds. This can be painting with varnish in several layers or impregnation with creosote. But no matter how carefully the wooden foundation has been processed, its service life will not exceed 7–9 years.

Frame mounting
The assembly of the greenhouse frame is carried out in stages:
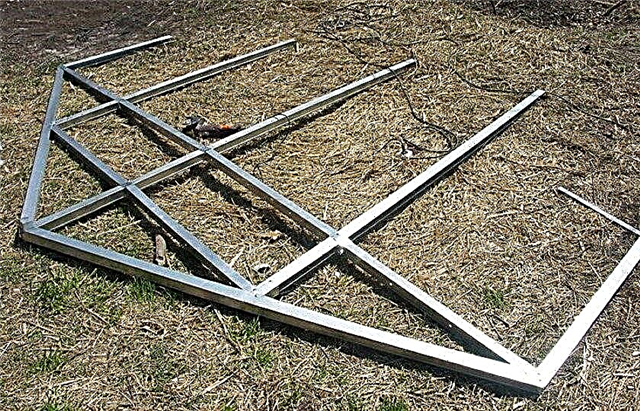
- To make the frame, the builder cuts the required number of longitudinal and transverse beams from galvanized profile, according to the drawing.
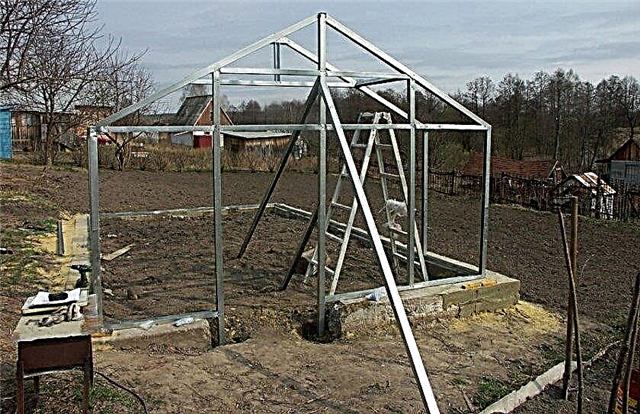
- The frame of the end walls of the greenhouse is assembled and fastened, while an entrance door is necessarily provided on one of the ends. From below, the frame is connected using bolts or metal welding to the fastening elements laid when pouring the foundation.
- Next, horizontal profiles and additional side frame racks located vertically are installed. For connection, it is recommended to use special lateral struts, which avoids deformation of the frame structure.
Important! When assembling the frame, it is undesirable to use welding (except for fastening to the foundation), since after this the builder will lose the opportunity to replace rusted structural elements without problems.
Greenhouse sheathing
After the metal frame is fully mounted, it is time to start covering the greenhouse with polycarbonate. For this, the master will need one or two assistants.
The algorithm for performing coverage:
- In turn, sheets of polycarbonate are applied to each rounded end of the greenhouse, from which the side parts will be cut. Using a marker on the transparent material, the boundaries of the future end part are applied. Marked sheets are laid on the ground with a flat surface, after which they are cut along the applied lines. For cutting use a manual jigsaw or grinder. Finished parts are attached to the galvanized profile of the ends with self-tapping screws or screws.
- Further, starting from the front closed end, where the front door is located, the greenhouse is covered with polycarbonate. The side parts of the polycarbonate sheet after laying are perpendicular to the soil. Two adjacent sheets are interconnected: with an overlap of 6-8 cm or joint to joint, using special H-shaped joints for polycarbonate. Inside the greenhouse along the connecting seam, a special gasket is attached to drain the condensate. The edges of the polycarbonate sheets need to be sealed to prevent water, dust or insects from entering the voids. Foreign objects in the voids of the cells will reduce the level of light transmission inside the greenhouse. Such a greenhouse will serve much less.
Video: Assembling and cladding a polycarbonate greenhouse
- When assembling a transparent coating, you can use ordinary screws with large heads. But the builder must take into account that the use of screws after some time can cause cracks in the plastic. For these purposes, it is most practical to use self-tapping screws using special thermal washers equipped with a sealant and a very wide flat head.
- Fastening the sheet to the structure is carried out every 25–40 cm. When tightening, you do not need to apply excessive force, because the screws do not twist tightly and all the way, it is advisable to leave a small gap, since under the influence of heat the components of the greenhouses expand slightly. At the four corners of the greenhouse, a corner profile made of plastic is used to connect the walls.
- To make the door leaf, a strong frame is made of galvanized profile, on top of which polycarbonate is fixed to the screws.
Important! When laying polycarbonate, hollow internal cells must always be directed downward, which will make it impossible to delay condensate voids.
Tips for what else can be done from the profile and drywall
The galvanized profile is widely used in construction, in combination with drywall, it is used for the installation of internal partitions, the creation of multilevel ceilings and zones of different levels in the room. In some European countries, even the frameworks of panel buildings are built from thick and durable galvanized profiles, although the height of such houses does not exceed 3 floors.
You can build a greenhouse with the help of a team of specialists, or do it for free, yourself or with the help of friends. A polycarbonate greenhouse allows a gardener to extend the growing season of vegetables and herbs for several months a year. If you complete its construction correctly, in compliance with all recommendations, then such a structure will serve its owner a very long time: from 7 to 10 years.


