Among the wide variety of tomato varieties, the Raspberry Giant occupies a special place. Tomatoes of this variety are characterized by a beautiful appearance and excellent taste, and cultivation does not take much time. The article will consider a detailed description of the "Raspberry Giant", as well as the features of growing varieties at home.
Grade description
Consider the basic information about the variety "Raspberry Giant":
- refers to determinant varieties;
- early ripening, with a maturity of 90-105 days;
- bred in Russia;
- has a well-developed root system;
- the formation of the first inflorescences occurs over a 5-6 leaf;
- fruits have a rounded shape;
- the fruits are characterized by excellent taste - sweet with minimal acidity;
- fleshy tomatoes, very juicy, with a small seed box, peel of medium thickness;
- the color of the fruit is raspberry;
- the fruits are very large - from 200 to 400 g;
- the yield of the variety is 18 kg per 1 sq. km. m;
- does not require pinching.

Advantages and disadvantages
The tomato variety under consideration has a lot of advantages and a minimum of disadvantages.
- The advantages of the "Raspberry Giant" include:
- the versatility of the fruit;
- excellent taste characteristics;
- beautiful appearance;
- the possibility of long-term transportation of fruits without loss of appearance;
- increased resistance to disease;
- simplicity in caring for plants.
- The minuses of the variety include:
- large fruit sizes, which is not very convenient for canning whole;
- the possibility of defeat by diseases and pests with poor care of the bushes;
- cracking of overripe fruits.
Self-growing seedlings
To save on the purchase of seedlings, you can independently sow tomato seeds purchased at the store or collected independently last year.
Sowing dates
Since the variety "Raspberry Giant" belongs to the early ones, the seeds must be sown in the middle or end of March, so that before the seedlings are planted in open ground, it will grow stronger and build up a powerful root system.
Did you know? The homeland of tomatoes is considered to be South America, where semi-cultural forms are still found in the wild.
The soil
The soil for seedlings can be purchased or prepared independently. In the second case, peat (2 parts), land from the garden (1 part), sand (1 part) and humus (0.5 parts) will be required. Before starting sowing, mix all the components of the earth, sift well.
Also, in order to avoid the development of diseases of seedlings or pests that can be in a freshly prepared soil mixture, it is disinfected with a double boiler. A double boiler qualitatively destroys pathogens, fungal spores and even weed seeds. The soil should be decontaminated in advance, approximately 10 days before use, so that the bacteria beneficial to plants can recover (since both harmful and beneficial microorganisms die under the influence of high temperatures).

The soil mixture, which is completely ready for use, is characterized by a loose structure, has good air permeability and moisture capacity. To improve the breathable properties of the steamed soil mixture, it is recommended to add dry sphagnum moss to it.
Capacity for growing
Seedlings are grown in a wooden box, individual cups or peat tablets. Experienced gardeners choose peat tablets for sowing seeds, as they are very convenient to use. They can be buried in the soil without destroying the earthen lump around the roots, thereby the plant's root system is not injured and more quickly takes root in a new place. It is also convenient to grow seedlings in plastic cups, but before planting them at a constant place of growth, they are cut and plants along with an earthen lump are planted in the soil.

You can sow seeds very quickly in wooden boxes, but when planting in open ground there are small problems that are associated with the need to dig up each plant, during which you can injure the root system.
Did you know? The leader in the cultivation and export of tomatoes in the world is China - 16% of world production.
Seed preparation
Purchased seeds are usually of high quality, so they do not need to be rejected. If you collected seeds yourself last year, you need to review them, discard hollow, damaged ones.
To determine for sure which of the seeds collected personally are suitable for sowing and which need to be thrown away, it is recommended to use salt water. To do this, use 0.5 tbsp. Of 0.5 l of water. l salt, stir well and immerse the seeds: those that have sunk to the bottom - quality ones that have surfaced - are not suitable for sowing.

High-quality seeds must be decontaminated: for this, use a weak solution (1%) of potassium permanganate, in which they are immersed for 30 minutes. After processing, the seed is washed with warm running water and dried.
To improve yield and development of the terrestrial part of plants, seeds should be treated with a growth stimulator. Popular stimulants include Epin and "Immunocytophyte"that are used according to the instructions. Treated seeds do not require washing with clean water: they are dried and left for 2 days at room temperature.
Sowing seeds
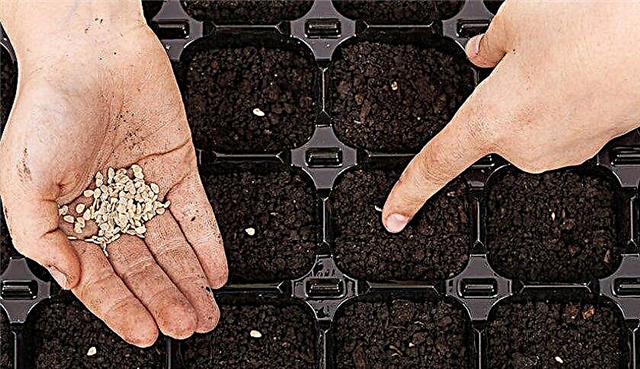
Sowing seeds is as follows:
- In the prepared container filled with the substrate, grooves are made; the depth of each 1 cm, the interval between them is 4 cm.
- Sow the seeds in grooves with a spacing of 3 cm between each seed (if sown in separate containers, then 2-3 seeds are placed in each glass with an interval of 3 cm).
- Sprinkle the seeds on top of the soil and spray a little with warm water from the spray gun.
Seedling Care
In order to obtain strong viable plants as a result of sowing, it is necessary to observe the recommended microclimate indicators in the room, to water and feed seedlings.
Immediately after sowing the seeds, a transparent film is pulled onto the container, creating a greenhouse effect that will accelerate germination and maintain the required moisture level. During the germination period, the room temperature should be set at +25 ° C. Humidity is maintained at 60%.
It is also better to place the container in a well-lit place, and in the evening provide seedlings with artificial lighting, so that the daylight hours are more than 12 hours a day. Periodically, the mini-greenhouse must be aired by opening the film for 1 hour to prevent the formation of mold or the development of pathogens in the soil.
When it takes 10 days after sowing and most of the seeds germinate, the film must be removed. The air temperature is then reduced to +18 ° C; lighting does not change, continuing to use additional.

They begin to water the seedlings when the plants get stronger, and their root system grows a little, before that they only spray it. When watering, it is necessary to ensure that water does not fall on the plants, and only the soil is moistened. Watered with water at room temperature, previously settled. Before the first true leaves appear, spraying is carried out once a week. When 2-3 real leaves appear on seedlings, they begin to water it under the root.
On the 10th day after the emergence of seedlings, seedlings can begin to fertilize. As supplements, light complexes of nitrogen-containing fertilizers are used, which include potassium salt, urea, superphosphates. Top dressing is diluted in water and used according to the instructions on the package.
Seedling hardening
Hardening seedlings is necessary in order to prepare it for possible temperature changes and changing growing conditions when transplanting into open ground. Hardening consists in a gradual change in temperature. On the 5th day after sowing, they begin to gradually lower the temperature in the room from +25 ° to +17 ° C during the day and from +18 ° to +12 ° C at night. Every day, it is recommended to lower the temperature by 1 degree so that the seedlings do not receive severe stress. In addition, the room is ventilated by opening the window first for 20 minutes and gradually increasing the amount of time to 4 hours.

Planting seedlings in a permanent place
Seedlings will be ready for planting in open ground in early June, when the soil warms up to +15 ° C, and the air temperature at night will not drop below +10 ° C. They recommend planting in the evening, when the sun is already setting and will not be able to dry the upper layers of the soil, which means that there will be a high probability that all plants will take over.
It is necessary to dig holes in depth to the full bayonet of a shovel, keeping the distance between the holes of 90 cm. Add 2 handfuls of humus and a little soil from the top layer of soil to the hole, then plant the plant, fill the empty space. Then the bushes are watered under the root with water at room temperature.

Features of outdoor care
After planting seedlings in open ground, the growing conditions completely change, therefore, to normalize growth and strengthen the root system, it is necessary to ensure proper care for the plants.
Watering
Watering the tomatoes is necessary when the topsoil dries well, about 1 time per week.
Tomatoes are watered with water at room temperature, abundantly, under the root, trying not to wet the plant itself. Watering is best done in the evening, so that the bushes absorb water during the night. If you water the tomatoes during the day, then the water can evaporate quickly, and the roots will not receive the required amount of moisture.Important! With heavy rainfall, watering is reduced to 1 time in 3-4 weeks.
Fertilizer application
Tomatoes need to be fertilized at least 3 times during the whole season, but it is better to feed them regularly - once every 2 weeks. Various fertilizers with a high content of phosphorus and potassium and a small amount of nitrogen are suitable for feeding. You can buy a ready-made complex of fertilizers or make it yourself. To do this, you need to purchase superphosphate (50 g), ammonium nitrate (15 g), potassium chloride (30 g) and dissolve all this in 10 liters of water.

Also, every 2 weeks, tomatoes are fed with magnesium, and during flowering, they are fed with boron: 1 g of boric acid is dissolved in 1 liter of water. The resulting solution is sprayed with tomatoes from the spray gun in the evening.
Shaping and tying bushes
The variety “Raspberry giant” does not require the formation of bushes, since it belongs to the determinants. In connection with the formation of large fruits, tomatoes are recommended to be tied to reduce the load on the plant. Tie up the tomatoes as soon as they are planted at a constant place of growth. Stakes are recommended to be installed on the northern side of the bush at a distance of 10 cm from the stem, driving into the soil 40 cm in depth.
Important! The height of the peg should be 1.5 m, so that it is enough for the entire period of growth of the bush.
Soil care
In addition to caring for the plant, it is also necessary to care for the soil around the bush. It is recommended to loosen the soil regularly after watering with the help of a pitchfork, in order to provide oxygen access to the root system of the plant. Weeding is done as needed when the soil is overgrown with weeds. Weeds must be removed carefully so as not to injure the roots of the tomatoes.

The soil around the bushes is mulched to slow down the growth of weeds and the drying process of the upper soil layer. Sawdust, dried grass, straw are used as mulch: the layer should be at least 5–7 cm in order to achieve the desired effect.
The hilling procedure is necessary to enrich the soil with oxygen, strengthen the roots and stems of the plant, and retain moisture at the roots. The first hilling is carried out 10 days after transplanting. Before this, the soil is watered, then the soil is raked, forming a mound, in the center of which the stem is located. The next hilling is carried out after 20 days.
Thus, growing Raspberry Giant tomatoes at home is quite simple, the main thing is to follow the care recommendations and follow all the procedures for normal growth and fruiting.

Network user reviews
ADVANTAGES: Harvest, tasty, sweet, salad grade, early, fleshy
DISADVANTAGES: No
From the experience of past years, I concluded that pink tomato varieties ripen better and taste sweeter than regular ones. Therefore, our choice fell on the Raspberry Giant. And also because it is early. The packaging says that this variety is the earliest of large-fruited varieties. I do not agree. The "raspberry giant" began to ripen in the same way with this mid-season variety of seeds in a package of 0.1 g, which is about 30-35 pieces. I sowed a dozen. When the seedlings began to grow, its leaves were not like ordinary tomato. I was surprised, thought, ((priests, that I grew up with it ... But I quickly calmed down because they smelled like leaves of tomatoes. The leaves are huge, really gigantic! Because of the long branches and large leaves, the plant looks spreading, and its height about a meter. It was necessary to chop and cut the leaves often. And here the first tomato ripened. True, it is not a giant at all. But the producer says that the first fruits will weigh 200-400 grams, and the next ones are bigger. So it is. There are more fruits above it. oh, their weight is decent, the bush bends under the weight of the fruit, even though I tied it in time. Although it’s not a giant, it’s definitely crimson. Its color is clearly different from the color of red tomatoes of another variety, which are pictured from above on the left. I was eager to test the "giant "to taste." I liked the "Raspberry Giant". Sweet! Tasty! Not liquid, sugar, little grains. In the salad is incomparable! I tell this variety - YES! I recommend!


